(실습1) 목적: Dicom 데이터를 로드하고 시각화 1. 라이브러리 설치
!pip install pydicom
!pip install scikit-image
!pip install natsort
!pip install nibabel
!pip install dicom2nifti
pydicom : Dicom 파일을 처리.scikit-image : montage를 사용해 여러 이미지를 2D 배열로 결합. natsort : 자연 정렬을 위한 라이브러리로, 파일 이름의 숫자 순서를 올바르게 정렬 .nibabel : NIfTI 파일을 로드하고 처리하는 라이브러리. dicom2nifti : DICOM 데이터를 NIfTI 형식으로 변환.
2. Dicom 파일 경로 설정 및 리스트 생성
BASE_PATH = '/content/drive/MyDrive/FastCampus/dicom_sample/pneumothorax/dicom-images-test'
SAMPLE_IMAGE_PATH = list(Path(BASE_PATH).glob('*'))
dicom_img_list = [list(i.glob('*/*.dcm'))[0] for i in SAMPLE_IMAGE_PATH]
print(dicom_img_list[:2])
Path.glob를 사용해 Dicom 파일 경로를 탐색.
dicom_img_list는 탐색된 Dicom 파일의 첫 번째 경로를 포함한 리스트를 생성.
하위 디렉토리가 많을 경우, list(i.glob('*/*.dcm'))[0]은 모든 파일을 가져오지 않고 첫 번째 파일만 선택.
3. Dicom 파일 읽기
number_img = 0
dcm_img = pydicom.dcmread(dicom_img_list[number_img], force=True)
dcm_img
pydicom.dcmread를 사용해 Dicom 파일을 읽음.
force=True는 Dicom 형식이 아닌 파일을 강제로 읽을 때 사용.
(0008, 0050) Accession Number, (0010, 0030) Patient's Birth Date 이러한 정보들은 지금 이미지에 보여지지 않음. 이는 학습이나 일반적인 이미지들은 익명화를 통해서 파일을 제거 하기 때문임.
4. Meta Data 정보 확인
def show_dcm_info(dataset):
    print("Filename.........:", dicom_img_list[number_img])
    print("Storage type.....:", dataset.SOPClassUID)
    pat_name = dataset.PatientName
    display_name = pat_name.family_name + ", " + pat_name.given_name
    print("Patient's name......:", display_name)
    print("Patient id..........:", dataset.get("PatientID"))
    print("Patient's Age.......:", dataset.get("PatientAge"))
    print("Patient's Sex.......:", dataset.get("PatientSex"))
    print("Modality............:", dataset.get("Modality"))
    print("Body Part Examined..:", dataset.get("BodyPartExamined"))
    print("View Position.......:", dataset.get("ViewPosition"))
    print("Image position......:", dataset.get("ImagePositionPatient"))
    if 'PixelData' in dataset:
        rows = int(dataset.Rows)
        cols = int(dataset.Columns)
        print("Image size.......: {rows:d} x {cols:d}, {size:d} bytes".format(
            rows=rows, cols=cols, size=len(dataset.PixelData)))
        if 'PixelSpacing' in dataset:
            print("Pixel spacing....:", dataset.PixelSpacing)
Dicom 메타데이터를 출력.
주요 필드:
SOPClassUID : 저장 유형.PatientName, PatientID, PatientAge: 환자 정보.
Rows, Columns: 이미지 크기.
PixelSpacing : 픽셀 간 거리.환자의 기본 정보를 출력하며, 데이터의 익명화를 검증할 수 있음.
5. 이미지 시각화 def plot_pixel_array(dataset, figsize=(10,10)):
plt.figure(figsize=figsize)
plt.imshow(dataset.pixel_array, cmap=plt.cm.bone)
plt.show()
show_dcm_info(dcm_img)
plot_pixel_array(dcm_img)
Dicom 이미지의 픽셀 데이터를 plt.imshow로 시각화.
fig, axs = plt.subplots(2, 5, figsize=(30, 10))

for idx,ax in zip(range(10),axs.flatten()):
    dcm_img = pydicom.read_file(dicom_img_list[idx]) # read dicom image
    img = dcm_img.pixel_array # get image array
    ax.imshow(img, cmap='bone')
목적: 3D 이미지 처리 및 GIF 생성
1. DICOM 이미지 로드 및 결합
BASE_PATH = Path('/content/drive/MyDrive/FastCampus/brain_images/00997/T2w')
dicom_images = natsorted(list(BASE_PATH.glob('*.dcm')))
print(f'number of dicom images : {len(dicom_images)}')
natsorted와 Path.glob를 사용해 .dcm 파일을 정렬된 순서로 탐색.
슬라이스 순서를 유지해 3D 데이터 생성 시 정확한 결과를 보장.
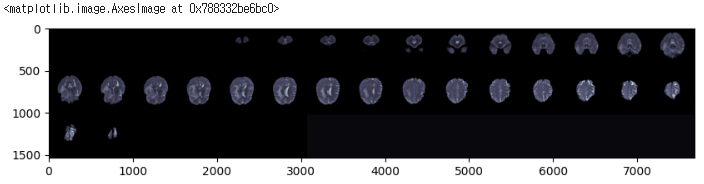
concat_images = np.array([pydicom.read_file(i).pixel_array for i in dicom_images])
plt.figure(figsize=(10,10))
plt.imshow(montage(concat_images, grid_shape=(3,15)), cmap='bone')
모든 슬라이스 이미지를 배열로 변환(pixel_array).
montage를 통해 2D 결합 이미지 생성.
2. DICOM → NIfTI 변환
dicom2nifti.convert_directory("/content/drive/MyDrive/FastCampus/brain_images/00997/T2w", "./")
nifiti_path = './8_t2w.nii.gz'
sample_img = nib.load(nifiti_path)
sample_img = np.asanyarray(sample_img.dataobj)
dicom2nifti를 사용해 DICOM 디렉토리를 NIfTI 형식으로 변환.
nibabel을 사용해 NIfTI 파일 로드.
.dataobj 속성을 통해 데이터 배열로 변환.
3. 3D 이미지 시각화
# plot 3d image use motage library
transpose_img = sample_img.transpose((2,1,0))
plt.figure(figsize=(10,10))
plt.imshow(montage(transpose_img, grid_shape=(3,15)),cmap='bone')
NIfTI 데이터를 변환(transpose)해 슬라이스 방향 변경.
montage로 2D 결합 이미지를 생성.
4. GIF 생성 클래스 class ImageToGIF:
"""Create GIF without saving image files."""
def __init__(self, size=(500, 500), xy_text=(80, 30), dpi=100, cmap='CMRmap'):
self.fig = plt.figure()
self.fig.set_size_inches(size[0] / dpi, size[1] / dpi)
self.xy_text = xy_text
self.cmap = cmap
self.ax = self.fig.add_axes([0, 0, 1, 1])
self.ax.set_xticks([])
self.ax.set_yticks([])
self.images = []
def add(self, image, label):
plt.set_cmap(self.cmap)
plt_img = self.ax.imshow(image, animated=True)
plt_text = self.ax.text(*self.xy_text, label, color='red')
to_plot = [plt_img, plt_text]
self.images.append(to_plot)
plt.close()
def save(self, filename, fps):
animation = anim.ArtistAnimation(self.fig, self.images)
animation.save(filename, writer='imagemagick', fps=fps)sample_data_gif = ImageToGIF()
label = nifiti_path.replace('/', '.').split('.')[-2]
filename = f'{label}_3d_2d.gif'
for i in range(transpose_img.shape[0]):
image = transpose_img[i]
sample_data_gif.add(image,label=f'{label}_{str(i)}')
sample_data_gif.save(filename, fps=15)
show_gif(filename, format='png')
슬라이스 이미지를 추가(add)하고 GIF로 저장(save).
슬라이스별 라벨 표시(label=f'{label}_{str(i)}).
matplotlib.animation 사용.
실제론 gif